If you want a fast, visually appealing website, you must optimize photos for a website effectively. Large, uncompressed images slow down load times, hurt SEO rankings, and frustrate users. Optimizing images boosts performance and improves your site’s overall appearance and visibility.
Choose the Right Image Format
Before uploading, select the correct file type. Each format serves a different purpose.
- JPEG is ideal for photos with gradients or many colors.
- PNG is best for graphics with transparency or sharp edges.
- WebP offers excellent quality with smaller file sizes and is supported by most modern browsers.
- SVG is perfect for logos and icons that need to remain sharp on any screen size.
Using the proper format is the first step to optimize photos for a website.
Resize Images to Fit Website Dimensions
Avoid uploading high-resolution images directly from a camera. If your website displays an image at 800px wide, don’t upload a 4000px version. Resize it to the exact dimensions needed.
Image editing tools like Adobe Photoshop, GIMP, or even free online resizers can help reduce image dimensions before upload.
Compress Image Files
Compression reduces file size while maintaining visual quality. This is crucial to optimize photos for a website and speed up page load times.
Use tools like:
- TinyPNG
- ImageOptim
- Squoosh
- ShortPixel (for WordPress)
A well-compressed image can be up to 80% smaller without noticeable loss in quality.
Use Descriptive File Names
Instead of uploading “IMG_9321.jpg”, rename it to something meaningful like “organic-coffee-shop.jpg.” Search engines use file names to understand image content.
Always include relevant keywords naturally in your file names. This is an easy win for image SEO.
Add SEO-Friendly Alt Text
Alt text describes the content of an image. It serves two purposes—improving accessibility and boosting SEO.
Example:<img src="organic-coffee.jpg" alt="Freshly brewed organic coffee in a ceramic mug">
Ensure your alt text is concise, accurate, and contains relevant keywords related to the image topic.
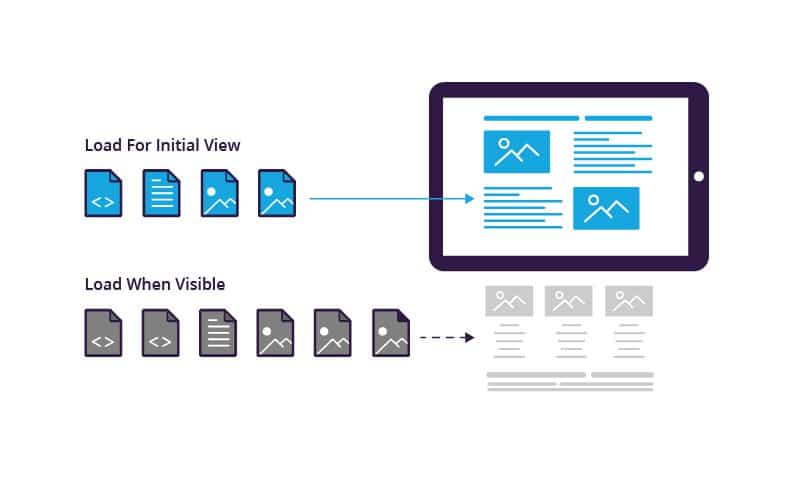
Enable Lazy Loading
Lazy loading defers the loading of images that are off-screen until the user scrolls to them. This significantly improves initial page speed.
Most CMS platforms like WordPress offer lazy loading by default, but you can also implement it using the loading="lazy" attribute in your image tags.
Use a Content Delivery Network (CDN)
A CDN stores copies of your images on servers around the world. When a user visits your website, they receive data from the nearest server. This drastically reduces loading time for global users and improves website reliability.
Popular CDNs include:
- Cloudflare
- KeyCDN
- Amazon CloudFront
Using a CDN is one of the most efficient ways to optimize photos for a website with high traffic.
Leverage Browser Caching
Set your images to be cached by browsers for a defined period. This ensures returning visitors don’t have to reload the same images repeatedly.
Use .htaccess rules or a caching plugin depending on your site setup. Caching is essential for both speed and performance.
Test Your Website’s Image Performance
Tools like Google PageSpeed Insights, GTmetrix, or Lighthouse help you audit how well your images are optimized. These tools also offer suggestions for improvement, such as resizing, compression, or format changes.
To optimize photos for a website, focus on correct formats, compression, dimensions, naming, and alt text. Implementing lazy loading, caching, and using a CDN will further improve your website’s loading speed and search engine visibility. Consistently optimizing your images leads to faster load times, better SEO performance, and an enhanced user experience across all devices.