A slow website costs you visitors, sales, and search engine rankings. When a page loads slowly, users often leave immediately. Consequently, this high bounce rate directly impacts your bottom line and SEO. Fortunately, website optimization doesn’t require hundreds of technical fixes. Instead, you can focus on three core pillars: lazy loading, caching, and compression. Mastering these techniques will solve most common performance issues. Therefore, you can achieve dramatically faster loading times and a superior user experience. This guide explains each pillar in simple, actionable terms.
Lazy loading is your first strategic defense against slow speeds. It intelligently loads content only when needed. Meanwhile, caching stores frequently used files to eliminate redundant downloads. Finally, compression shrinks file sizes for faster network transfers. Together, they form a powerful optimization trifecta. Essentially, they address the root causes of bloat and latency. Best of all, you can implement them without deep technical knowledge. Platforms like WordPress, Shopify, and Wix offer built-in tools or simple plugins. Let’s explore each pillar to understand how and why they work.
How Lazy Loading Transforms Performance
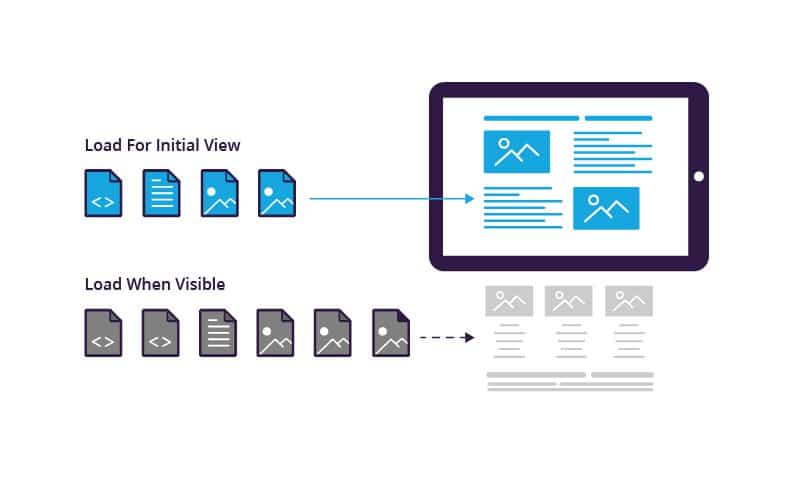
Lazy loading is a selective loading technique. It makes your website load content lazily, but not in a disruptive way. Without it, a visitor’s browser must download every image, script, and video on a page immediately. This happens even for content far down the page that the user may never see. Fortunately, lazy loading solves this by only loading content within the user’s current viewport. As the user scrolls, the browser loads new content just before it comes into view. This approach significantly cuts initial page weight and speeds up the critical first load.
Technically, lazy loading works by using a lightweight placeholder. The browser displays this placeholder until the real content is needed. When an element nears the viewport, the browser swaps the placeholder for the actual file. Modern browsers support lazy loading natively via the HTML loading="lazy" attribute for images and iframes. For more complex scenarios, JavaScript libraries like Lazysizes provide greater control. Ultimately, the result is a faster perceived load time and a smoother user experience. This is especially vital for media-heavy sites like blogs, portfolios, and online stores.
Implementing Lazy Loading on Your Site
Enabling lazy loading is straightforward on most platforms. For WordPress, native lazy loading exists for images. However, plugins like Smush or WP Rocket offer more advanced controls. On Wix, lazy loading is built-in and automatically enabled. Shopify users should check their theme; many include lazy loading by default. If not, you can add the loading="lazy" attribute to image and iframe tags in your theme’s liquid files. For custom websites, add the loading="lazy" attribute to relevant HTML tags. Additionally, consider a JavaScript library for finer-grained control over video and background images.
Follow key best practices for optimal results. First, avoid lazy loading critical above-the-fold content like logos and hero images. These elements should load immediately to prevent layout shifts. Next, use low-quality image placeholders (LQIP) or blurred previews for below-the-fold images. This provides a better visual cue than an empty box. Finally, always test lazy loading after implementation. Sometimes you must adjust the trigger threshold so content loads slightly earlier, preventing a blank screen during fast scrolling. Properly configured, lazy loading is a zero-compromise speed boost.
The Essential Role of Caching
Caching is the practice of storing frequently accessed files for quick retrieval. Think of it like keeping your favorite spices on the kitchen counter. Without caching, a browser must download every website file on every visit. Conversely, caching stores static assets like CSS, images, and JavaScript on the user’s local device. On subsequent visits, the browser loads these files from the local cache. This process makes pages load almost instantly and drastically reduces server load. Specifically, there are several types of caching, each operating at a different level.
Browser caching saves files on the user’s device. Meanwhile, server caching creates static HTML copies of dynamic pages. CDN caching stores your site’s files on a global network of servers. Furthermore, object or database caching saves the results of frequent database queries. Together, they create a layered speed system. For example, a returning visitor might get HTML from server cache, images from browser cache, and those files delivered from a nearby CDN server. This multi-layered approach eliminates redundant work and slashes load times.
How to Activate and Manage Caching
Activating caching depends on your platform. WordPress users should install a dedicated plugin like W3 Total Cache or WP Rocket. These tools configure browser, server, and CDN caching with a few clicks. Meanwhile, Wix and Shopify have built-in caching that requires no manual setup. For custom hosting, check your host’s dashboard for caching options. Additionally, CDNs like Cloudflare also have caching settings in their dashboards. Often, you simply need to toggle the setting to “On.” Many of these solutions are free, with premium tiers for advanced features like automatic cache preloading.
Effective cache management is crucial. First, set long cache durations for files that rarely change, like your logo or main stylesheet. Next, use a CDN even if your primary server is fast; it improves global delivery. Remember to clear or purge your cache after making significant website updates. If you don’t, visitors may see outdated content. Most caching plugins and CDN dashboards include a prominent “Purge Cache” button. Therefore, make clearing cache part of your standard update routine. This ensures users always experience your latest improvements without sacrificing speed.
The Power of File Compression
Compression reduces the size of your website’s files before they are sent over the network. It is like vacuum-sealing clothes for storage—the contents are unchanged, but the package is smaller. Consequently, smaller files transfer faster, leading to quicker page loads. Text files like HTML, CSS, and JavaScript can be compressed by up to 80% using algorithms like Brotli or GZIP. Similarly, image compression reduces photo file sizes without noticeable quality loss. Modern formats like WebP and AVIF offer superior compression to old JPEGs and PNGs.
Different content types require different compression strategies. For text, enable Brotli or GZIP compression on your server or CDN. For images, use a tool that automatically compresses uploads and converts them to WebP. For video, host on dedicated platforms like YouTube or Vimeo, which handle compression optimally. The goal is to shrink file sizes while preserving quality. This balance ensures your site looks great but loads quickly. Ultimately, compression works silently in the background, delivering the same content in a fraction of the time.
Enabling Compression Across Platforms
Most modern platforms handle compression automatically. In WordPress, caching plugins typically enable Brotli or GZIP compression. For images, use a plugin like Imagify or ShortPixel. These tools compress new and existing images and serve modern formats. Meanwhile, Wix and Shopify automatically compress both text and images. If you manage your own server, enable compression in your Apache or Nginx settings. Additionally, CDNs like Cloudflare offer Brotli compression in their speed settings; you just need to activate it. Essentially, compression is often a one-time setup that yields continuous benefits.
Adopt smart compression best practices. First, prefer Brotli over GZIP for better compression ratios and broader browser support. Next, always provide fallback images in PNG or JPEG format for browsers that don’t support WebP or AVIF. Furthermore, never over-compress images to the point of visible quality loss; use “lossless” or “smart lossy” settings. Finally, test different compression levels to find the sweet spot for your site. Many plugins offer a preview feature. Remember, compression complements caching and lazy loading. Together, they create a synergistic effect far greater than any single technique alone.
Integrating All Three Pillars for Maximum Speed
The true power lies in combining lazy loading, caching, and compression. Lazy loading reduces initial page weight. Meanwhile, caching eliminates repeat downloads. Finally, compression shrinks every file that is transferred. Implemented together, they attack speed bottlenecks from every angle. Start by enabling compression and caching at the server or CDN level. Then, activate lazy loading for images and videos. Furthermore, use a comprehensive plugin like WP Rocket for WordPress to manage all three seamlessly. This integrated approach is the most reliable path to a fast website.
The benefits extend beyond raw speed. Improved performance boosts user satisfaction and conversion rates. It also positively impacts your Google Core Web Vitals scores, a key SEO ranking factor. Fortunately, you don’t need to be a developer to achieve this. Modern tools have democratized high-performance optimization. Therefore, invest a small amount of time configuring these pillars. The return is a faster, more competitive website that retains visitors and climbs search rankings. In today’s digital landscape, speed is not a luxury; it’s a fundamental requirement for success.